How to Self-Host Blnk on Brimble
Run Blnk, the open-source ledger, on Brimble: the API, worker, Postgres and Redis in one private environment, set up by your coding agent, the dashboard or a brimble.toml.

 Claude
 ChatGPT
 Perplexity
You need a ledger the moment your product holds money for someone else: wallets, payouts, escrow, credits. A ledger lets you hold, move and settle that money with a full history behind every number.
Instead of spending months building one yourself, you can run Blnk, an open-source ledger. Here's how to get it running on Brimble, with your balances, transactions and audit trail in a Postgres database you own.
Blnk needs four things to run: an API, a worker, Postgres and Redis. Brimble can host all four in one place. Blnk already comes packaged as a Docker image, so there's no code to write or build. You give Brimble the image name, and it runs it.
What you're deploying
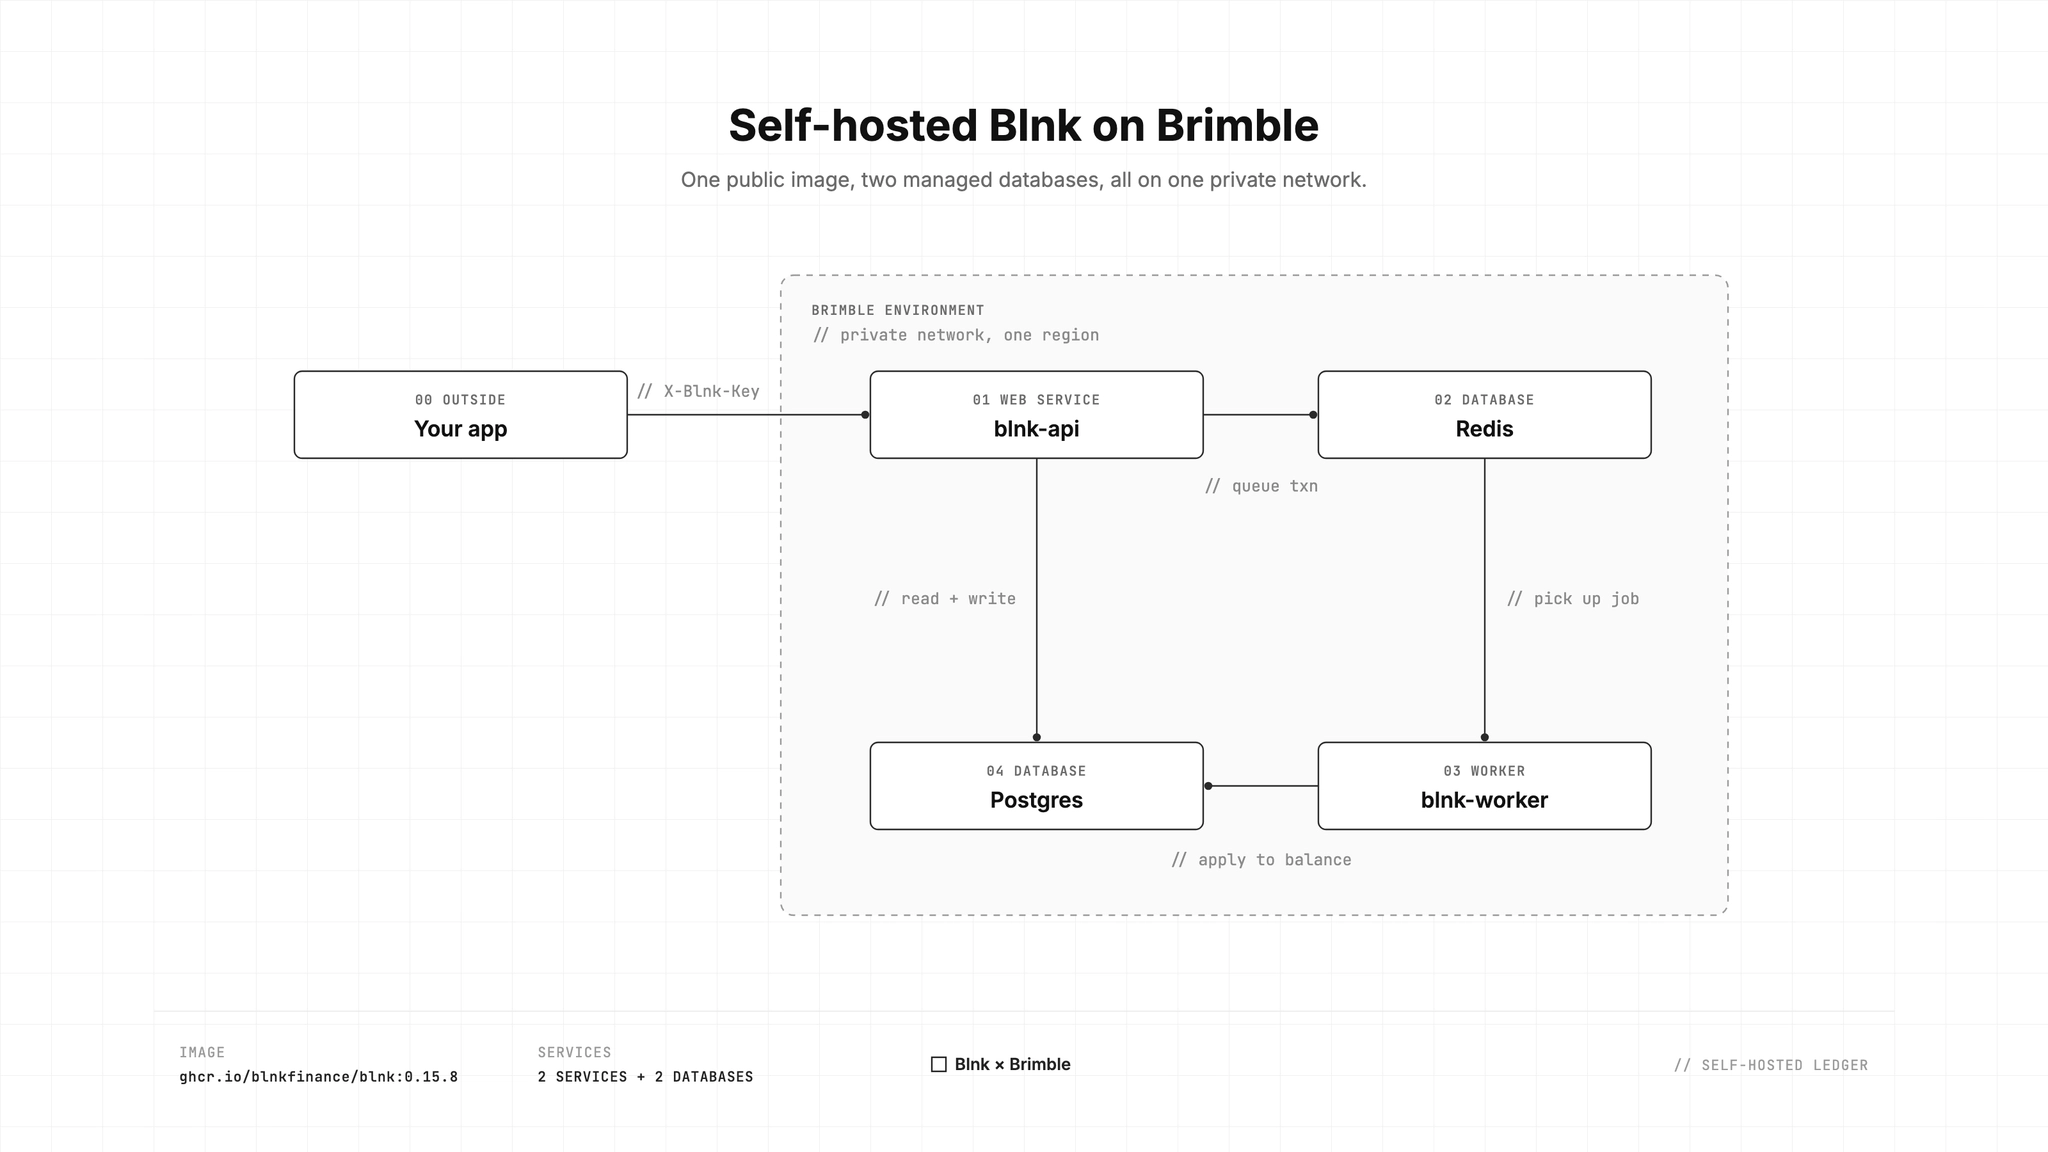
Here are those four things, and how they work together once they're on Brimble:
Your app sends requests to blnk-api, with your secret key in a header called X-Blnk-Key. When you create something like a ledger or a balance, the API saves it straight to Postgres.
Transactions take one extra stop. The API drops each one into a queue in Redis, and blnk-worker picks it up and applies it to the balances in Postgres. That's why you need the worker: without it, transactions wait in the queue forever and no balance ever changes.
One thing to notice: the API and the worker are the same image, ghcr.io/blnkfinance/blnk:0.15.7. That's the image name you give Brimble.
The 0.15.7 at the end is the Blnk version this guide uses. If you're moving a Blnk ledger you already run, use the version it's on now. Either way, put that number wherever you see 0.15.7 below.
You'll deploy the image twice, and a different start command turns one copy into the API and the other into the worker. We'll set that up a little later.
Back in the diagram, the four pieces sit inside a dashed box labelled Brimble environment. An environment is a group of projects on Brimble, such as production or staging. Projects in the same environment can reach each other over a private network, so Postgres and Redis never have to be open to the internet. That only works if all four sit in the same environment and the same region, so keep that in mind as you create them.
Now, to actually create these four, you can go three ways. If you already work with a coding agent like Claude Code or Cursor, you can give it the whole job and watch it go. If you'd rather see every piece go in, you can click through it yourself in the Brimble dashboard. And if you like keeping your setup in git, you can describe all four in one file and let Brimble build them when you push. All three end with the same four pieces running.
Let your coding agent do it
Out of the box, your agent can't touch your Brimble account. The Brimble CLI (version 0.4 or newer) has a command that gives it access. Open your terminal and run:
brimble mcpIt lists the agents it finds on your machine, all ticked. Press space to untick any you don't want, then Return. Then it asks how your agent should sign in to Brimble. You have two choices:
- Browser (recommended): the CLI only adds Brimble's address to your agent's settings. You then connect from inside your agent: in Claude Code, run
/mcp, choose brimble and pick Authenticate (in Cursor, it's Settings → MCP → Connect). A Brimble page opens and asks for an API key. Create one under Manage API keys, pick what the agent may do, and paste it there. Your API key never ends up in your agent's settings file. - API key: it works straight away, but the CLI writes your Brimble API key into your agent's settings file as plain text.
Now your agent knows Brimble, but it doesn't know Blnk. Without Blnk's docs, it has to rely on whatever it remembers about Blnk, which may be out of date. So give it the docs too. In Claude Code, run:
claude mcp add --transport http blnk-docs https://docs.blnkfinance.com/mcpFor Cursor or any other agent, open the Docs MCP page, click Copy agent prompt, and paste it into your agent's chat. It adds the server for you.
Then tell your agent what you want. Something like this, with your Blnk version in place of 0.15.7:
Self-host Blnk Core on Brimble, using the image ghcr.io/blnkfinance/blnk:0.15.7 (keep the tag).
Create Postgres and Redis as Brimble managed databases in one environment, plus two services from that image: a web service for the API and a worker.
Don't ask me for database passwords: wire Blnk to the databases with Brimble's {{@…}} references, and add ?sslmode=disable to the Postgres one.
Set PORT and BLNK_SERVER_PORT to 8000 on the API, and turn off Brimble password protection on it.
Set the pre-start commands: blnk migrate up on the API, and exec blnk workers on the worker.
When it's up, post a test transaction and show me the balance change.
Your agent will create the databases and the two services, set everything up, deploy them, and finish with the test transaction.
Set it up yourself
If you'd rather build it yourself, the whole thing happens in the Brimble dashboard, and it comes down to a few forms. It takes more clicks than the agent route, but you'll see exactly where each piece lives. One thing before you start: pick your environment from the dropdown at the top right, so all four pieces end up in the same one.
The databases come first, since everything else points at them. Click Create new project, pick Database & Queue, and choose PostgreSQL, then do the same for Redis in the same region. You can leave public access off, because nothing outside Brimble needs to reach them. Brimble names each one something like postgresql-db-xxxx, and you'll need both names in a minute.
Then the API. Click Create new project again, pick Deploy Docker image, and enter the Blnk image with the version you picked earlier, for example ghcr.io/blnkfinance/blnk:0.15.7. Brimble puts everything Blnk needs on a single form.
Give the project a name, something like blnk-api, and keep the deployment type as Web Service: this is the part your app talks to, so it needs a public URL. In Pre-start command, put blnk migrate up, so Blnk creates its tables before the API starts.
The rest is settings. Blnk can read them from a blnk.json file, but it also takes every one as an environment variable, and that's easier here because the Secrets box accepts a whole env file at once. Remove the PORT row Brimble suggests, then paste this in, with your own key and database names:
PORT=8000
BLNK_SERVER_PORT=8000
BLNK_SERVER_SECRET_KEY=<your-secret-key>
BLNK_SERVER_SECURE=true
BLNK_DATA_SOURCE_DNS={{@postgresql-db-xxxx.PRIVATE_CONNECTION_STRING}}?sslmode=disable
BLNK_REDIS_DNS={{@redis-db-xxxx.PRIVATE_CONNECTION_STRING}}
The {{@…}} parts are Brimble references. Put your own database names in them, and Brimble fills in the real connection strings when it deploys. For the key, any long random string works. If you have a terminal open, openssl rand -hex 32 makes a good one.
Click Deploy Project, and while it builds, set up the worker.
The worker uses the same form and the same image, with three differences. Set the deployment type to Worker, since it runs in the background and doesn't need a URL. Paste the same secrets, minus PORT and BLNK_SERVER_PORT. And in Pre-start command, put exec blnk workers.
That last one is the step that's easiest to get wrong. Brimble runs the image's own command for image projects, so after the pre-start runs, both services fall through to the image's default, blnk start. exec makes the worker take over the pre-start step instead, so it keeps running and never gets there. If you leave out exec, the worker starts and then stops as soon as the pre-start step finishes, without any error to tell you. The only odd thing you'll notice is the worker's deploy saying Building forever, and that's fine.
Give both a minute, then open blnk-api's Overview. If it says Ready and shows a URL, your API is live. Copy that URL, because you'll need it in a second. If it says Failed, the Deployments tab has the log and tells you why.
Or keep it all in a brimble.toml
If you'd rather have your setup in git than in a dashboard, Brimble can read it from a file. Put a brimble.toml in a repository, and every time you push, Brimble sets up whatever the file describes: services, databases and their settings. To change something later, you edit the file and push again.
Blnk has no code of its own to build, so the repository stays tiny: two short Dockerfiles that point at the Blnk image, and the toml file.
Give these three files a repository of their own, so your ledger only changes when you mean it to. You can keep them in a blnk/ folder in your app's repository instead, set as the project's root directory, but then add blnk/** as a watch path on both projects. Otherwise every push to your app restarts your ledger.
Dockerfile, for the API:
FROM ghcr.io/blnkfinance/blnk:0.15.7Dockerfile.worker, for the worker:
FROM ghcr.io/blnkfinance/blnk:0.15.7
CMD ["blnk", "workers"]
That second line is how the worker gets its own command on this route. Brimble still runs the image's own command, the same as in the dashboard, so the worker's Dockerfile changes that command instead.
Then the file itself, brimble.toml:
#:schema https://brimble.io/schema/brimble.json

[databases.blnk-postgres]
engine = "postgresql"
version = "17"
region = "eu-central"

[databases.blnk-redis]
engine = "redis"
version = "8"
region = "eu-central"

[services.blnk-api]
type = "web"

[services.blnk-api.build]
dockerfile = "Dockerfile"

[services.blnk-api.deploy]
before_start = "blnk migrate up"
port = 8000

[services.blnk-api.env]
BLNK_SERVER_PORT = "8000"
BLNK_SERVER_SECURE = "true"
BLNK_DATA_SOURCE_DNS = "{{@blnk-postgres.PRIVATE_CONNECTION_STRING}}?sslmode=disable"
BLNK_REDIS_DNS = "{{@blnk-redis.PRIVATE_CONNECTION_STRING}}"

[services.blnk-api.secrets]
required = ["BLNK_SERVER_SECRET_KEY"]

[services.blnk-worker]
type = "worker"

[services.blnk-worker.build]
dockerfile = "Dockerfile.worker"

[services.blnk-worker.env]
BLNK_SERVER_SECURE = "true"
BLNK_DATA_SOURCE_DNS = "{{@blnk-postgres.PRIVATE_CONNECTION_STRING}}?sslmode=disable"
BLNK_REDIS_DNS = "{{@blnk-redis.PRIVATE_CONNECTION_STRING}}"

[services.blnk-worker.secrets]
required = ["BLNK_SERVER_SECRET_KEY"]
It's the same setup as the dashboard route, just written down. A few lines are worth a closer look, and the brimble.toml reference has every field:
before_startruns the migrations before the API starts, the same as the pre-start command in the dashboard.porttells Brimble the API listens on 8000, and setsPORTfor you.versionhas to be one Brimble offers: Postgres 15, 17 or 18, and Redis 8.regionon each database has to match your services.{{@blnk-postgres…}}and{{@blnk-redis…}}point at the databases by their names in this file, so there's no connection string to copy. Using them also links each database to the service.secrets.requiredkeeps the secret key out of git. Brimble holds the deploy until you've added the key in the dashboard.
Two optional extras. If your editor has a TOML extension, the #:schema line at the top gives you autocomplete and catches typos. And if you have the Brimble CLI, brimble config validate checks the file before you push.
Push the three files to GitHub. In Brimble, click Create new project, pick the repository, name the project blnk-api and keep it a Web Service. Its first deploy stops with Required secret BLNK_SERVER_SECRET_KEY is not set. That's expected: add the key to blnk-api's environment variables, then redeploy.
This time the deploy waits on Needs approval. Open Configuration → Config as code, and Brimble shows you a plan: it will create blnk-postgres, blnk-redis and blnk-worker, and apply the API's settings. Approve it and give it a few minutes. Brimble creates the databases first, then the worker. The worker's first deploy stops for the same key, so add it to blnk-worker too, and redeploy.
When blnk-api says Ready and blnk-worker says Building, you're at the same point as the other two routes. Copy the API's URL from its Overview and send some money through it.
Make sure money actually moves
A Ready status only tells you the API started. It doesn't tell you the worker is doing its job, and in Blnk, the worker is where balances actually change. So the real test is to send some money and watch it land. It takes two requests.
First, send $100 from @World, the balance that stands for money outside your system, to a test balance called @TestWallet. Balances whose names start with @ are created on the spot, so there's nothing to set up first. Swap in your API URL and secret key:
curl -X POST https://<your-api-url>/transactions \
  -H "X-Blnk-Key: <your-secret-key>" \
  -H "Content-Type: application/json" \
  -d '{
    "amount": 100,
    "precision": 100,
    "currency": "USD",
    "reference": "test-001",
    "description": "Test deposit",
    "source": "@World",
    "destination": "@TestWallet",
    "allow_overdraft": true
  }'
The response comes back with "status": "QUEUED". That means the API accepted the transaction and handed it to the worker. Give it a few seconds, then read the balance:
curl https://<your-api-url>/balances/indicator/@TestWallet/currency/USD \
  -H "X-Blnk-Key: <your-secret-key>"
Look for "balance": 10000 in the response. That's $100 in cents. The worker picked the transaction up, and your ledger works. If it still shows 0, check blnk-worker's logs in the dashboard. It's almost always the worker's command: the exec, or Dockerfile.worker if you went the brimble.toml way.
See your ledger in Blnk Cloud
Curl is fine for a test, but day to day you'll want to browse balances and transactions without writing requests. Blnk Cloud gives you that on top of your own instance, and your data stays in your database.
In Blnk Cloud, go to Instances → Connect on-prem instance, paste your API URL and secret key, and leave Deploy Managed Core unticked.
Cloud then gives you a connection key and asks you to run a small query agent. The agent reads your Postgres and streams the results to Cloud. Your Postgres is private, so the agent has to run next to it, on Brimble, in the same environment.
Create it the same way as the worker: Create new project → Deploy Docker image, enter blnkfinance/query-agent:latest, make it a Worker, and call it something like blnk-query-agent. Blnk Cloud gives you the connection key, but the agent runs on your Brimble account, so its settings go there. Add two secrets: CONNECTION_KEY, the key from Blnk Cloud, and DB_URL, the same database reference you used for Blnk:
DB_URL={{@postgresql-db-xxxx.PRIVATE_CONNECTION_STRING}}?sslmode=disable
CONNECTION_KEY=<the key from Blnk Cloud>
Deploy it and watch its logs. When you see query agent started, refresh Cloud, and @TestWallet is there with its $100.
If something's off
If a transaction stays QUEUED and the balance never moves, the worker isn't running. Check that its pre-start command is exec blnk workers, with the exec. Don't go by the worker's status either: with exec, its deploy says Building forever, so a test transaction is the only real check. If the command is right and transactions still sit in the queue, restart the worker. Anything already queued gets applied as soon as it's back. And if the worker's deploy says Ready instead of Building, it has started as the API instead of the worker, so redeploy it. On the brimble.toml route, that usually means the worker is building from Dockerfile instead of Dockerfile.worker.
If Blnk can't reach Postgres, the connection string is usually missing ?sslmode=disable. If the connection resets, or the connection string comes out empty, one of the services is in a different environment from the database. Switch the environment dropdown and make sure all four projects are listed together.
And if the API says Ready but its URL doesn't respond, Blnk is probably listening on its default port, 5001. Make sure PORT and BLNK_SERVER_PORT are both 8000, then redeploy.
That's a self-hosted ledger on Brimble: your data in your own Postgres, and a worker you've watched apply a transaction. From here, point your app at blnk-api, send the key in X-Blnk-Key from your server, and use the Blnk docs to model your money flows.
Written by